

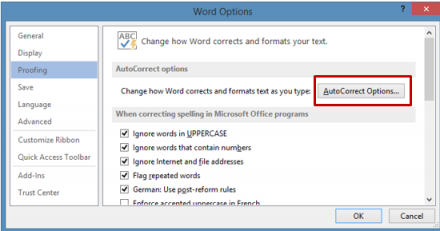
You are probably familiar with MS Office’s AutoCorrect feature. This is the feature that automatically corrects simple typos and common misspellings. For example, ‘teh’ changes to ‘the’ as soon as the space bar is hit. If it does not, then you probably do not have this feature enabled. You can find the AutoCorrect screen by going to File→Options→Proofing Menu Item→AutoCorrect Button.
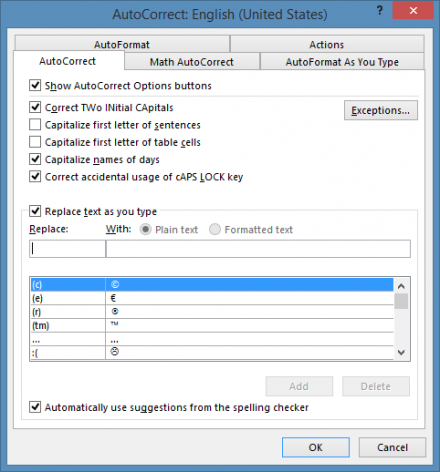
Check the ‘Replace text as you type’ checkbox’
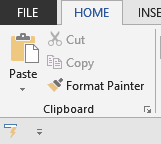
Adding AutoCorrect to Quick Access Toolbar
Before going much further, one annoyance should be remedied—the convoluted steps required for accessing the AutoCorrect Screen. To make this easier let’s add AutoCorrect to the Quick Access Toolbar (QAT). Find the QAT above or below the Word Ribbon. Right click and select ‘Customize the Ribbon….’
Select ‘Quick Access Toolbar’. Choose from ‘commands not in Ribbon’ and scroll down to ‘AutoCorrect Options…’ Click ‘Add’ and OK.
You will see the AutoCorrect button appear:
Extending the Power of AutoCorrect
Now that we have easy access to AutoCorrect, let’s look at two little known ways to extend its usefulness.
Self-Completing Phrases: AutoCorrect can be used not only to fix a mistyped word but also to complete a longer word or phrase.
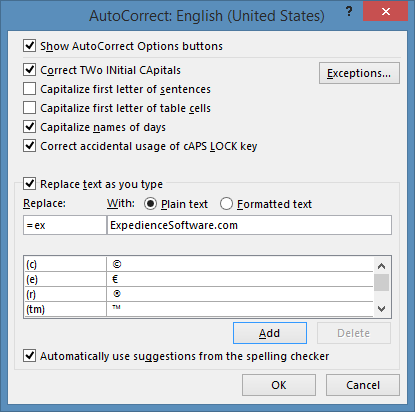
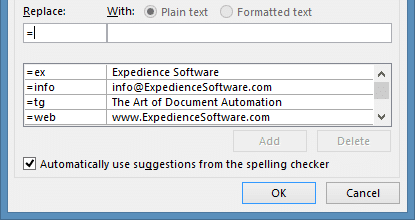
For instance the name of my company, –‘ExpedienceSoftware,’ is quite long making it tiresome every time I need to type it, which is fairly often. I have added an AutoCorrect item to automate that task for me: To do this, select the desired replacement text: and open the AutoCorrect dialog box:
The text I selected appears in the ‘With’ field automatically. I simply type in a short phrase that will be easy to remember. In this case I chose ‘=ex’.
Next time I need to type my email address, for instance, I just time ‘=ex’ will automatically change to Expedience Software. I could do the same for my email, address, or any other block of text (up to 255 characters). Here are some other examples of common uses:
Name
Company Name
Tagline
Email Address
Address Block
Acronym definitions (more about this later)
- · Naming Conventions: Notice that I put an equal sign ‘=’ at the beginning of the ‘Replace Text.’ This is not required but makes it very convenient to group my custom entries together making it unlikely that I will accidentally invoke the replacement:
 Plain vs. Formatted text: AutoCorrect offers two different options for the type of content that will be used in the replacement: ‘Plain text’ and ‘Formatted text.’ In the examples above I selected the ‘Plain text’ option. The ‘Plain text’ option is limited to 255 character and, as the name implies, only text. But it has the advantage of a broader range of use: once you save an entry it can be used in every Office application that supports AutoCorrect. So, once I have saved these entries in Word, for example, I can now use them in Outlook and Excel.
The ‘Formatted text’ option has its own advantages. It can contain much larger volumes of content and more varied content, including images. So, for example, if I wanted to add a logo to my custom AutoCorrect list, I would simply select the image and add:
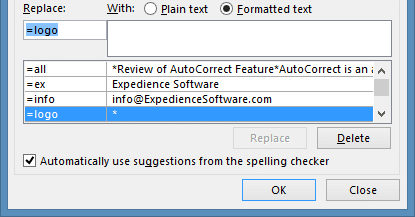
Typing ‘=logo’ automatically inserts the Expedience logo:

However, this AutoCorrect’ entry will only be available in the Office application in which it was created.
Share your AutoCorrect list
Another advantage of the ‘Plain text’ option is that is easier to distribute to others. Recall that ‘Plain text’ entries can be used across Office applications. This is because the customized AutoCorrect list is saved in a single common ‘.acl’ file associated with your Windows user profile. (Formatted AutoCorrect stores its lists in the Normal template, and behaves more like AutoText.)
The default location of the .acl file is C:\Users\Name\AppData\Roaming\Microsoft\Office, though this may vary. The file will have a name that resembles MSO1033.acl.
Exit all Office Applications before copying the .acl file. Copy the desired .acl file from the source computer to a disc or network drive, etc. Exit all Office Applications on the destination computer, and then paste the .acl file to the following folder: C:\Documents and Settings\username\Application Data\Microsoft\Office. Your customized AutoCorrect list, with Acronym Dictionary, is now on the destination computer.

The 5 Best Proposal Software Solutions 2023
Crafting a compelling proposal that effectively showcases your company is no walk in the park. The process demands transparency, impeccable writing, and an aesthetically pleasing design to make a lasting impression on potential clients. However, in the fast-paced...

Is it Worth Responding to an RFP?
7 Factors to Help You Decide
When deciding whether to respond to a Request for Proposal (RFP), it's essential to evaluate its worth and potential value to your business. Here are some factors to consider when determining if an RFP response is warranted. Alignment with your Business Strategy...

Why Do Businesses Need RFP Response Software?
Businesses often use RFP (Request for Proposal) response software to streamline and automate the process of responding to RFPs. RFPs are a common way for companies to solicit proposals from vendors or service providers, particularly in the B2B space. If you are...

3 Benefits of Using Proposal Software
Although proposals are just one of the many elements of a buyer's journey and the sales cycle, they play a significant role in sales success and winning new business. How can you raise the level of professionalism and positively impact the number, quantity, and...

Complete Guide to RFP Software
A Request for Proposal (RFP) is a document issued by a business, non-profit, or government agency to outline the requirements for a specific project and secure offers from various vendors to bid on the project. Responding to an RFP manually, without the help of RFP...